Clay shooting: grouse and partridge!
Clay shooting
1: DRIVEN GAME SHOOTING
No matter if it’s a grouse or partridge… you’ve only got two barrels so pick your birds carefully and choose which one to take first.
A point worth remembering when you’ve only got a second or two to decide which it’s going to be is to play to your strengths – most right-handers, for instance, find it easier to swing the gun from right to left, so keep this in mind when birds are on the wing.

Unlike ‘driven’ clays, you won’t know exactly where the birds will come from so adopt a neutral stance facing the oncoming line of beaters and move your feet if the bird passes to the left or right.
Footwork is vitally important because grouse can suddenly veer off so what at first might appear to be a straight driven bird could, in an instant, quarter across the shooting position or even present itself as a crosser.
Keep the gun just out of the shoulder pocket in a comfortable, relaxed ready position – muzzles slightly down so as not to obscure your sight of the birds – ready for a smooth, parallel gun mount.
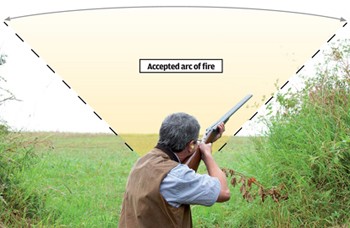
Concentrate on the acceptable ‘arc of fire’ in front, but remember that your next door neighbour’s straight incomer could turn in front of the line and become a crossing shot from your butt.
Grouse are the fastest of all game birds and it’s this speed which ensures many of them get through the line unscathed.
And like partridges they also fly in coveys, altering position as they do so.
The golden rule then is to pick a bird and stay with it – don’t suddenly switch to another because it looks nearer or easier… the result will be a miss every time!
2: DRIVEN CLAY SHOOTING
Shooting driven clays – and particularly team flushes – is a great way of getting in the groove for the real thing.
And if you can find a shooting ground that has a layout where several clays can be thrown at a time to resemble a covey in the air, so much the better – you will now be able to shoot at targets that almost match the birds you will be shooting in the field.
But let’s stick to shooting singles and pairs for the moment.

Watch the bird before you shoot to ascertain your pick-up point and decide your kill zone.
Your ready stance is important but not crucial as there’ll be time for minor adjustments after you call for the bird.
Relax, stand with feet shoulder-width apart, weight on the front leg with your leading foot pointing towards the intended kill point.
As always, keep the mount smooth. If the bird is particularly fast, or you’re not that confident with it, then consider a kind of ‘half-way’ house approach to your gun’s ready position.
Keeping the stock just out of the shoulder pocket will not tire the arms and means the gun can be mounted just that little bit quicker than when shooting in a genuine gun down style.
As the bird approaches the kill point start to move the gun and when it’s mounted keep your face tight to the stock and ensure it stays there.
Don’t lift your head to watch the target because it will almost certainly result in a miss.
Any shooting style can be used for driven birds, but I think the best option is probably to use the pull away method – once the muzzles are in front of the bird instinct will tell you how much lead you need before pulling the trigger.
Keep the swing going after the gun’s fired.
3: UP FRONT
Driven clays can be taken late just overhead and turned into satisfying bags of ‘dust’ but this approach should be avoided at all costs when it comes to live quarry because shooting birds too close results in ruined meat.

Also, letting a fast flying covey get too close will result in you rushing your shots – and missing.
A good shot kills his birds well in front so try and do the same with your practice clays and remember… a bird/clay shot 30 or 40 yards out needs a lot less forward allowance than one taken directly overhead.
4: TURNING TO YOUR ADVANTAGE
On a partridge drive it’s worth altering your stance if you’re not confident shooting at high quartering birds.
By turning, say, 30° or so, the bird now becomes a crosser.

This approach won’t be possible on a lot of sporting stands – simply because the safety cage won’t allow it – but it’s a handy thought to have in the back of your mind!
5: WHY YOU MISS
Irrespective of whether the target is game on a walked up shoot, or a clay on a sporting layout, the reason most quartering away birds are missed is simple – it’s because the shooter is aiming!
The best approach is to choose – and keep to – your chosen kill point. In one smooth action bring the gun up – making sure the muzzles are slightly below or on the bird – then simply pull ahead of the target and pull the trigger.

Don’t forget to keep the gun moving after the shot. If you’re going on a walked-up day then the best place to practice for what’s coming is a Down-the-Line range where you will shoot birds that randomly quarter away to the left and right, as well as straight ahead.
This discipline is usually shot ‘gun up’ but you should call for the targets with the gun out of the shoulder; you might miss a few more clays this way but shooting them ‘gun down’ adds a great deal more realism to proceedings.
A grouse or partridge that flushes within range should be ‘easy meat’ so to speak but a lot are missed simply because the shooter ‘pokes’ at the bird or thinks he’s dealing with one going straight away when it’s actually quartering slightly right, or left.
The golden rule is to focus on the bird and watch it a moment or two before bringing your gun to the shoulder; if you can see the side of the bird’s head then the gun needs to be swung in the same direction.
Squeeze the trigger as the muzzles pass the bird’s beak and keep the swing going after the shot has been taken.
6: CASE STUDY
If you haven’t got access to a DTL range then go along to your usual Sporting layout and ask the owner/manager if he can set up a practice stand throwing a rising quartering-away bird.
On the firing point ensure your ready stance is comfortable, weight slightly forward and the leading foot – as well as gun muzzles – pointing towards the kill zone.

Call for the target and use both hands to bring the gun smoothly to the shoulder.
Don’t let the trigger hand do all the work because this will cause the muzzles to dip resulting in a miss below.
Aim to keep the gun parallel during the mount and remember that if the muzzles are too high to start with they will obscure your view of the clay.
Alternatively, if they are held too low, you’ll probably end up playing catch-up with the clay resulting in a rushed shot and a probable miss.
It’s incredibly important that you’re able to see the bird at all times.
By keeping the gun moving, combined with the swinging action of getting ahead of the bird, the muzzles will almost automatically be the right amount ahead of the bird (the lead) when your brain says ‘fire.’
7: IT’S BEHIND YOU!
Ideally you should try and kill all driven birds in front of the butt, not only does it look better, it’s also safer because it means you will not be swinging through the line of Guns.

Posts are often – but not always – placed either side of a grouse butt to stop this happening but in the heat of the moment it’s easy to forget where you are and keep the gun swinging a little longer than you ought.
If you have to shoot a bird behind you should always:
» Check beforehand that pickers-up are at a safe distance.
» Dismount the gun (flick the safety on if you reckon there’s time), making sure the muzzles point skywards as you make a 180° turn.
» Reposition your feet firmly before starting the remount.