

News
HOW TO…. Construct a stand alone high seat
<strong>Careful positioning and a well-planned build make for an ideal freestanding high seat, says Sparsholt College’s Charles Smith-Jones</strong>
Would you like to speak to our readers? We offer sponsored articles and advertising to put you in front of our audience. Find out more.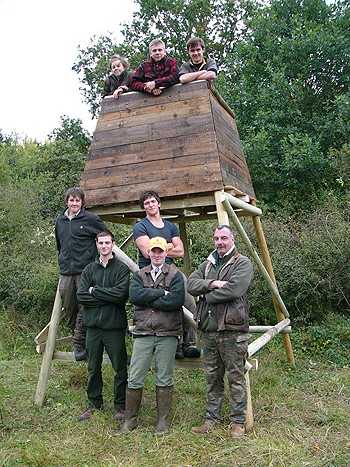
WHAT YOU’LL NEED
Materials
– 4x12ft, 4in diameter round fencing posts
– 12x12f t half-round fencing posts
– Flooring (builders? planks, or solid sheets on supports of 3inx2in timber will both work well)
-Timberlok screw bolts or similar fixings (for example, threaded rod and nuts or coach bolts)
– Fencing wire and staples (for the ladder)
– Wire mesh (weldmesh or similar) for the platform floor
– Supports and plank for seat (around 6in to 8in wide for comfort)
– Cladding for the side ? we used 36 thin planks stripped from 6ft pallets and cut to size (chipboard, tarpaulin, camoufl age net or similar are good alternatives)
– Nails or staples for fixing the cladding
– Creosote substitute and brush (for any untreated wood)
Basic tools
– Hammer, wood saw, bow saw, ratchet set (if using Timberlok fixings), cordless drill
– Personal protective equipment (hard hats, gloves and working boots)
– At least one extra set of hands ? this is not a one-person job.
There is a little clearing on my stalking patch measuring no more than 100m², which seems to have an almost magical attraction to deer. Upon reflection, the attraction is not really that magical. Surrounded by a thick wall of small trees on three sides and dense scrub on the other, the deer (roe, muntjac, and an occasional fallow) feel safe there. The centre is mostly open, but interspersed with low brambles and a few heavily browsed bushes. It?s difficult to approach and has some food value to deer all year round; it?s also a bit of a suntrap early in the morning.
Apart from the general difficulty in approaching this deer Shangri-La quietly and unseen, the next problem is taking a safe shot once you are there. The ground is flat and, if that doesn?t make it awkward enough, a new housing development has been built not far over the estate boundary. There are limited opportunities for safe shooting from ground level, and what is really needed is a high seat. The trouble is, there is no tree robust enough to prop one against ? the only answer is to build a free-standing high seat.
One such opportunity came when I needed a short construction project for a group of my Sparsholt game and wildlife students.
TAKE THE FIRST STEPS FOR THE PERFECT HIGH SEAT
Accurate siting, comfortable design and stable construction are vital for your high seat
STEP 1: Ensure the seat is correctly positioned
The first job was to pinpoint where the seat would go ? the finished construction would be heavy, so it made sense to build it in place. Three factors influenced our decision:
. By putting its back to the direction of the housing estate, we immediately made the shooting options safer.
. We also ensured the approach route to the seat was out of sight and facing into the prevailing wind direction (there?s no point in sitting in a high seat if you have cleared the area with your scent first); some quick work with a bowsaw ensured that the approach would be silent.
. Finally, we took into account the rising and setting of the sun to avoid the shooter being dazzled at critical times.
STEP 2: Make the seat design big enough to fit two people
There was no specific design for the seat, and though I had a basic concept in mind, we largely made it up as we went along. This was, after all, a learning session and I wanted the students to do most of the thinking here, hence the lack of formal plans. The structure was to be based on four 12ft poles. After some discussion, we agreed that to accommodate two people, the top would have to be about 4ft 2in wide, and by splaying the legs out to about 8ft, we would not only have a strong and stable structure, but also it would be economical in our use of the half-round 12ft poles that we were using for crosspieces and bracers. This was the only wood that I had to buy; the rest of the construction materials were good-quality reclaimed pieces so as to keep the cost down, though I did pay a bit extra for pressure-treated full and half-round poles to ensure that the skeleton of the seat had a longer life. An alternative to the poles might have been cut timber, using at least 4inx2in and 3inx1in in place of the full-rounds and half-rounds respectively.
STEP 3: Choose a layout in an A-frame shape
We constructed the front and back of the seat as two identical A-frames while still flat on the ground. Someone quickly noticed that the cross-piece at the base of the seating area would have to be on the inside of the frame to provide a support for the platform ? a good observation, which saved annoying reconstruction work later on, and it underlined the need to think things through before picking up tools. For all the main fixings we used Timberlok screws. Coach bolts or threaded rod, cut to length, would have done the job just as well, however.
Once the A-frames were complete, we added a ladder up to the platform base on
the back section. The front section had a diagonal bracer added between the bottom crosspiece and the platform base, and was cladded from the latter up to the shooting rail with planks taken from old pallets and treated with creosote substitute. This could have been done after the seat frame had been erected, but such jobs are much easier with the frame lying flat. We decided not to clad the rear of the seat as, apart from access, it was backing on to some fairly dense low trees and there did not seem any point in covering that side. If I eventually decide to cover the back, a piece of tarpaulin that can be folded back for access will do the job nicely. We could, in fact, have used materials other than wood, such as old tarpaulin or a camouflage net for the cladding, but a solid wooden side is more permanent and won?t move with the wind. It?s also a welcome barrier between the stalker and the elements on those cold, breezy winter mornings.
STEP 4: Fit the front and back frames
With the front and back sections completed, it was time to fit them together. Before we did so, we made sure that we had the side, bottom, platform and top rails cut to size. As the structure was to be square, this was simple, and we duplicated the lengths of the rails already in place. We had the option of assembling the frame upright, which we discarded on grounds of safety and height, or with the frames horizontal but upright on their edges. Again, this would not work because of height ? the bottom rail was 8ft tall and we didn?t have a stepladder. By turning the front section over so that it was lying on its front, and supporting the back section over it, some swift work fitting the Timberlock bolts soon had the top and platform rails in place on both sides. With several hands to help, the complete structure was tipped upright, the bottom rails secured into place, and the diagonal side bracers were added in no time. With fewer people a rope might have been necessary to help stand the structure upright.
STEP 5: Build the floor, clad the sides
The platform base was now fitted. We could have used any number of suitable options, but I had some 3inx2in cut fencing rails which, laid diagonally across the platform, provided a strong foundation for five-ply boards cut to size. Scaffolding planks would have been equally suitable. While this work was going on, we also wired the ladder rungs with standard fence wire and staples as a precaution against breakage.
With the floor in place, the side cladding could go on, working from the platform base upwards. A covering of wire mesh went over the floor, both as protection against slipping and as another precaution against the wood rotting too quickly. It will be an easy job to replace the flooring, if it becomes necessary, but, like wiring the ladder rungs, it always makes sense to guard against accidents.
STEP 6: Give your seat some support
The last job was to fit a seat strong enough to hold two people simultaneously. The 3inx2in fencing rails also provided seat supports, fixed between front and back uprights on either side, and a piece of scaffolding plank was laid between them to form a seat. Another simple but effective innovation from the group was to fit a 1in scrap of timber to each end of the seat, making it possible to turn over the plank and raise it to accommodate a slightly longer-legged occupant more comfortably.
STEP 7: Bear in mind safety rules
As a finishing touch, a sign was attached to the ladder warning against unauthorised use of the seat. No matter how private you think a high seat location might be, this is an essential precaution against a passer-by climbing it and subsequently injuring themselves. We live in an age of compensation culture and it pays to guard against potential court cases. Equally important is a regular inspection programme ? we do this annually with all our seats, be they metal or wooden, to ensure that they are safe and serviceable. A proper register is kept as a permanent record that this has been done.
—————————————————————————
I was delighted with the finished result. Not only was it solid as a rock, but also, it was clearly a professional-looking piece of work and the team could be justifiably proud of their efforts. I?ve sat in a wide variety of high seats over the years, some of which have terrified me, but this one ranks among the best.
I couldn?t resist a sit-out two days later. Despite it being so new to the clearing, and still smelling strongly of creosote substitute, I had no less than fi ve roe within shot of the high seat in the hour leading up to dusk. Fortunately for them, the buck cull had been completed some time previously, and the doe season was still a couple of weeks off, so all were allowed to go on their way. The muntjac I had hoped for eluded me, even though one barked continuously from within the tangle of foliage about 50 yards off to my left. I consoled myself with the knowledge that I would no doubt get my chance soon enough, and quit my vigil with a clear impression that this seat was going to be an asset for years to come. Congratulations to the team, with all credit for a good job well done.
Charles Smith-Jones is a lecturer in deer and wildlife management at Sparsholt College, Hampshire.
Related articles
News
Duke's Challenge raises record-breaking £685,000 for GWCT
The shooting community has backed wildlife conservation in spectacular fashion, raising a record-breaking £685,000 for wildlife conservation
By Time Well Spent

News
‘So what exactly do you lot do, then?’
You’d be surprised how many projects staff and volunteers deliver, as well as BASC’s vital work helping members, says Conor O’Gorman