★ Win a pair of Brandecosse Capriolo boots worth £219! Click here to enter ★
Gralloching kit – these are the essentials
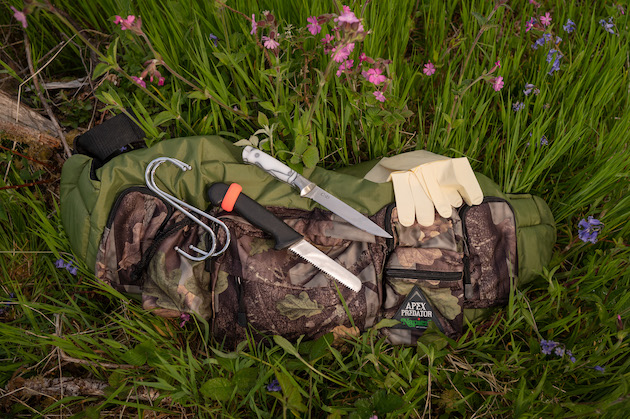 Chris Dalton's gralloch kit - five items of equipment essential for the task - the Apex Predator Roe Sack; Emberleaf Knife; Bone Saw; Stainless Steel S-hooks and disposable gloves
What is gralloching?
The term ‘gralloch’ is derived from the Scottish word grealach and defined as “the process of removing the entrails of a dead deer”. An efficient, timely and hygienic removal of a deer’s internal organs is required to avoid any risk of food contamination or damage. The gralloch is the process of removal of the stomach and intestines, with the term ‘pluck’ meaning the organs on the head side of the diaphragm, primarily the heart and lungs. The whole process requires some key equipment so here’s the gralloching kit I have come to depend on.
I oversee training for people who are starting out on their stalking journey, along with those at the other end of the spectrum as they work towards the standard required to negotiate Deer Stalking Certificate Level 2. There are various methods of conducting a hygienic gralloch and best practice would recommend doing the minimum in the field, with the bulk of the work conducted in a clean larder environment.
Gralloching kit for the field
It matters not which method you use, as long as it is compliant with the relevant food-handling regulations and you are not potentially exposing the carcass to any form of contamination during the process. In my case, as I am stalking on foot a long way from the larder and with little opportunity to get a vehicle to the shot site, I have to gralloch in the field.
Time is one of the primary factors in preventing carcass contamination and we need the beast to cool quickly. As a general guide the deer should be bled immediately, gralloched within 20 minutes and back in the larder within two hours. I often opt to conduct a full evisceration of the deer close to where I shoot it.
A moulded handle on the Field, Moor & Stream bone saw gives excellent grip
First things first
I will hang the roe from a tree, around head height as a nice working position. It is hung by the rear legs, upside down, which allows the blood to drain into the chest cavity, making the subsequent bleed more effective. I remove the gralloch by opening the stomach wall and cutting through the breastbone all the way down to the bleed hole using a bone saw.
I will also open the aitchbone in the pelvic area, allowing me to remove the anus. All that is holding the deer’s organs and stomach now is the connective tissue and the diaphragm skirt — once gently cut, gravity will take over and all the internal organs will fall forward and to the floor.
The deer is now fully eviscerated and effective cooling is starting, as the deer is suspended with air flow around it. In this state, clearly any contact with the floor will expose the carcass to environmental contamination so dragging is not an option — the beast must be carried back to the larder in some way.
If you are able to get to the location, it is best to return a clean carcass to the larder via vehicle or ATV. However, I am usually unable to do this so I use a form of roe sack, a key part of my gralloching kit. The deer is carried inside this, on my back, to the truck where I will lay it out in a carcass tray, again allowing cooling while I drive back to the larder.
The whole process is simple but absolutely essential. My gralloching kit consists of five key components and, after many years experimenting with different products, these are what I carry on any stalking outing.
The Apex Predator game sack makes lightwork of extracting a carcass
Roe sack
It took me a long time to find a roe sack I could get on with. In the early days, most were of a similar style to the standard hiker’s backpack, which is slung over your shoulders supported by two carrying straps through the arms. This is fine when hiking but it is really cumbersome when I also have a rifle slung over my shoulder.
It was rarely comfortable and I invariably managed to tangle the rifle and bag straps when setting up for a shot. Suppliers came up with other forms of waist bags that you could open up to provide a method of transporting your shot deer.
[/deal-block]
After searching through a number of different sacks, I have used the Apex Predator for more than 10 years. This product suits me perfectly for three reasons. First, it fits around the waist, so it is not in the way of my rifle while I’m stalking. Secondly, it has lots of handy, well-thought-out zipped pockets, so all my essential kit is always ready to go. Finally, it opens up when needed to form a good-sized carrying sack with detachable plastic liner large enough for a mature roebuck — I have had two yearlings in it, but that was a bit of a squeeze.
Back at the larder, the liner can be removed and cleaned. It does come with a spare liner as well.
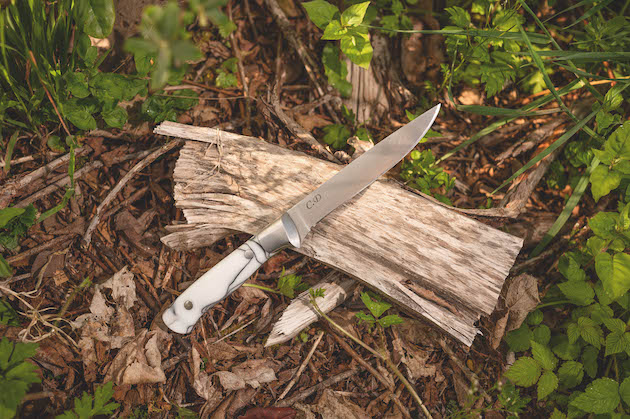
A custom hunting knife from Emberleaf is not cheap but you really do get what you pay for
Knife
Buying a hunting knife is very much like buying a car; we all have differing views and budgets. Essentially, any deer you gralloch is going into the food chain one way or another, so the selected tool must comply with food safety standards. Not least of which is a fully cleanable blade and handle.
There is a huge range of knives on the market, but for me the Rolls-Royce of knifemakers is the team at Emberleaf. I was introduced to an Emberleaf while doing some deer management training for some guys in Ireland, and was completely blown away by the surgical sharpness of the knife and its lines. That was that and I simply had to have one.
My own is a customised Garron, which really is a thing of beauty. It holds an edge incredibly well, comes with a 5in blade, longer than many but to me that is an ideal size — particularly useful for the thoracic bleed on a red when you really do need to make a deep incision. It’s incredibly well balanced and Emberleaf offers a lifetime guarantee.
A custom knife is not cheap, but like most things in life you tend to get what you pay for. Additionally, if you are not that good at sharpening you can send it back to the team and it will come back serviced, fully resharpened and ready for action for a small charge.
A custom Garron from Emberleaf, the Rolls-Royce of knifemakers
Bone saw
As I open up the pelvic area and ribcage in the field, a bone saw of some description is required. This has to be carried, so I have a sheath to carry it on my waist, or I can carry it in the Apex. There is a choice; most seem to be in the form of a serrated blade with an L-shape tip at the end and a T-shaped handle. This makes opening up the aitchbone — where you want a flat cut — difficult, as the lip at the end of the saw sticks and prevents you from making the required flat sawing action. I tried one years ago and it went in the bin.
I use a saw in my gralloching kit from Field, Moor & Stream. It has a serrated edge, a tapered blade and is fitted with a plastic moulded handle for good grip. This allows me to make a flat cut across the pelvic bone as well as a slashing, angled cut to open up the ribcage.
Rolson stainless steel S-hooks tick the boxes
S-hooks
You would think these are fairly simple, but I have seen a number of people with inadequate S-hooks for numerous reasons. Either they are not strong enough, not fully cleanable, pointed at the ends, too small or too large. If you need to carry them, the pointed type that butchers use as meat hooks are potentially dangerous, both when you are carrying them or hanging the deer in a tree. My S-hooks are made by Rolson, are stainless steel, 160mm long and 6mm thick. They come in a pack of two and I always carry a couple of sets in my gralloching kit, just in case. This size is ideal and I have had fallow suspended from them, so they are plenty strong enough.
[/deal-block]
Disposable powder-fee surgical-grade gloves are a godsend for keeping everything clean and sterile
Disposable gloves
Gloves are a simple thing but essential for fieldwork to prevent cross-contamination. To be honest, they are a really sensible and cheap method of keeping your hands and kit clean. Hot water and soap are not readily available three miles up a hill. You can purchase a box of 100 disposable gloves from most outlets and I use surgical gloves, Gammex PF, which are latex and powder-free.
They are a really good fit and easy to get on, even when you’ve got wet hands, which I suppose is likely among medical staff. I even managed to get hold of some during the height of the pandemic.
They come in a sterile wrap, which is double-sealed in a bag. You can easily tear the bag, put it to one side and open up the paper wrap, which I lay my knife and saw out on while I work. When I’ve finished, the dirty gloves and wrap go into the paper bag and into my pack for later disposal — all very nice and clean.
There are plenty of options on the market, but these are the five things not to be without. As I have to carry everything on my person, it has to be light and practical — and I only take essentials in my gralloching kit. After all, I have to carry them and — given a successful day in the field — another 17kg of gralloched deer inside the roe sack as well.
[/deal-block]
Related Articles
Stalking diary: the boundary-crossing buck that made the morning hard work
Waking at 3am is only half the battle when a boundary-crossing young buck decides to make Charlie Blance's morning roe stalk as difficult as possible
By Charlie Blance
Simulated game shooting: like game shooting minus the feathers
Once dismissed as mere off-season practice in tweed, the simulated game day has become a sport in its own right; Selena Barr asks four leading operators what separates a standout day from a chaotic on...
By Selena Barr
Get the latest news delivered direct to your door
Subscribe to Shooting Times & Country
Discover the ultimate companion for fieldsports enthusiasts with Shooting Times & Country Magazine, the UK’s leading weekly publication that has been at the forefront of shooting culture since 1882. Subscribers gain access to expert tips, comprehensive gear reviews, seasonal advice and a vibrant community of like-minded shooters.
Save on shop price when you subscribe with weekly issues featuring in-depth articles on gundog training, exclusive member offers and access to the digital back issue library. A Shooting Times & Country subscription is more than a magazine, don’t just read about the countryside; immerse yourself in its most authoritative and engaging publication.

