★ Beat print – get early access to the news by signing up to the Shooting Times newsletter here ★


How clays will improve your game shooting
Shooting coach Mark Russell explains why a couple of hours on the clay ground will pay dividends on the peg
The first of October is always a milestone day for shooters. Unfortunately most of us have to ignore the glorious 12th – the sheer costs involved with shooting driven grouse makes it way out of the league of ordinary sportsmen – but the beginning of October heralds the start of the pheasant season, and what great sport it offers.
That said, you do need to be prepared. Shooting live quarry is an entirely different kettle of fish to shooting sporting clays. You owe it to the quarry to ensure you kill birds cleanly – but how do you practice? Easy… on the clay ground!
A round of clays can be a great sharpener – an ideal way to get your eye in and get the swing going ready for the coming season. Having said that, you’ll still need to concentrate on your technique.
In this shooting tuition piece I will look at the best ways to tackle driven birds – pheasant and partridge. If they’re grouse, however, well, good luck to you… enjoy!
A typical setup
For this example we’ll assume that the birds presented on the clay ground are traditional driven birds. The trap will be to the front of the stand and the flight line of the target passes directly over the top of your head. Although the presentation of the clays will be similar wherever you shoot, there could be differences to the way you tackle the bird if, for instance, the clays are thrown from a high tower rather than a trap at ground level. But let’s assume the trap is on the ground and you’ve already had sight of a target to see where the visual pick up point is. As such, you’ll have decided where your preferred kill point is going to be.
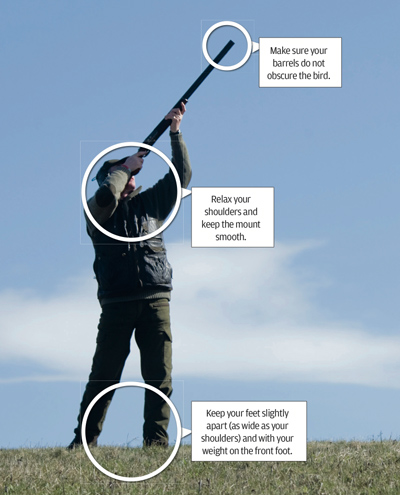
Footwork
Your initial stance is important but not crucial – there will always be time for minor adjustments after you call for the bird. That said, you should try to be relaxed and feel comfortable, with your feet slightly apart (as wide as your shoulders) and with your weight on the front foot. I reckon the toe of the front foot should be pointing towards five past the hour and the back foot towards three o’clock (just remember five past three and you won’t be far wrong.)
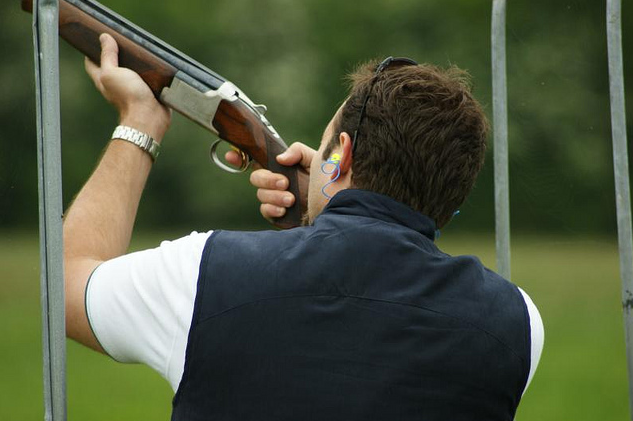
Keeping watch
Keep your eyes half-focussed on the expected pick up point as you call for the bird. I’d advocate that you always shoot this type of bird gun down, so be ready to mount the gun when you think the bird is hittable. I always reckon that shooting gun up is doomed to failure for a couple of reasons; first off it will make your arms really ache (not conducive for good shooting of any kind) and secondly the muzzles might obscure the bird as it leaves the trap. As always, keep the mount smooth. If the bird is travelling particularly fast, or you’re not that confident on this type of target, it might be worth considering a kind of ‘half-way’ house approach to your gun’s ready position. Keeping the stock just out of the shoulder pocket will not tire the arms and will mean the gun can be mounted just that little bit quicker than when shooting proper gun down.
Read steady…
Start to mount the gun as the bird approaches your chosen kill point, but don’t be tempted to bring the gun up too early.
Face off
Make sure your face is tight to the stock and keep it there! One of the most common mistakes made when shooting driven targets is to raise the head off the stock. This is because – by the very nature of swinging ahead of the clay – the muzzles can obscure the bird from sight. i’ve lost count of the number of times that novices lift their head to try and get a glimpse of the clay before pulling the trigger. obviously, if your head’s not on the stock, the gun’s not pointing where you’re looking. The result, almost inevitably, being a resounding zero on your scorecard.
What style?
Any shooting style can be used for driven birds, but in my opinion the best option is probably the pull away method, followed by swing through and, finally, maintained lead. Equally important to remember is not to aim; shoot at a target and you’ll miss. Pull the muzzles ahead of the bird, rely on your instincts to tell you how much lead you need and pull the trigger. Keep the swing going after the gun’s been fired.
Early bird
It’s always best to take the bird earlier than later – in an ideal world you want to be dusting the target 15 or 20 yards out – but always be prepared to transfer your weight onto your back foot if the bird is approaching the point where it’s going to be almost above you.
Novice shooters are often perturbed because they can’t see the bird when they pull the trigger, but the only advice i can offer is to simply ignore this fact and get on with it. If your technique is consistent, let your swing and your instinct take control… i’m reasonably confident you’ll break the clay.
Quartering birds
For birds that are not quite coming directly at you, that is, they’re quartering slightly to either right or left, a handy tip is to turn slightly, say up to 30 or 45° so that the incomer becomes, in effect, a crossing bird. True, this won’t always be possible on the clay ground because the cage around the stand won’t allow it, but it’s always worth having the idea at the back of your mind when you’re on your peg – just in case!
Behind you!
To be honest this usually only applies when you’re shooting driven game at a peg, but there may be the odd occasion on a clay ground when the cage allows you to turn and shoot at a bird that’s gone over and is now behind the stand. (it goes without saying… but i’m going to say it anyway… that safety is the paramount concern. nobody should ever swing through the line to fire at a bird behind. out in the field the only reason to fire at this type of bird is if it’s been pricked with the first barrel.) in either scenario, though, there’s a simple, and effective, way of switching from an incomer to a going away bird.
Related Articles
Shooting
Drey poking kit guide: essential equipment for grey squirrel control
Invasive grey squirrels do a great deal of damage to our trees and their numbers need controlling, so you must have the right kit
By Shooting Times
Get the latest news delivered direct to your door
Subscribe to Shooting Times & Country
Discover the ultimate companion for fieldsports enthusiasts with Shooting Times & Country Magazine, the UK’s leading weekly publication that has been at the forefront of shooting culture since 1882. Subscribers gain access to expert tips, comprehensive gear reviews, seasonal advice and a vibrant community of like-minded shooters.
Save on shop price when you subscribe with weekly issues featuring in-depth articles on gundog training, exclusive member offers and access to the digital back issue library. A Shooting Times & Country subscription is more than a magazine, don’t just read about the countryside; immerse yourself in its most authoritative and engaging publication.

