★ Win a pair of Brandecosse Capriolo boots worth £219! Click here to enter ★
How to learn the maintained style of shooting
Sporting Gun's shooting instructor shows how the maintained lead style of shooting could increase your scores and give you the 'X' factor.
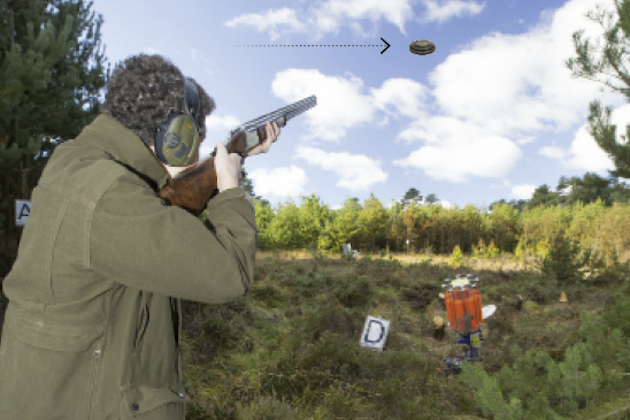
Shooting maintained lead is not an easy style to master, but every shooter should try the technique; it could help you hit more birds.
The proof comes in the form of former three-times World FITASC Champion, John Bidwell. John brought the maintained lead style of shooting to the fore with great success. (Read more advice on hitting different clay targets.)
The principle of shooting maintained lead
The whole concept of shooting maintained lead style is simple.
- The muzzles (and, therefore, the lead given) are always in front of the target.
- The gun muzzles are never on, or behind, the bird as it’s travelling; they’re always in front.
All you’ve got to do is keep the gun ahead of the target and pull the trigger.
All you’ve got to do … Well things can be more difficult than this and problems arise when shooters haven’t got to grips with the basic principles. We’re trying to arrange a collision between the stream of shot and the clay as it flies through the air. There’s obviously going to be a delay in the time between pulling the trigger and the shot reaching the target, so we give lead to the bird to allow the collision to take place.
Let’s say the lead is the distance/angle the muzzles are in front of the target as we pull the trigger. Using the ‘swing through‘ and ‘pull away’ styles, the actual swing of the gun helps us to assess and create the amount of forward allowance we need the muzzles to be ahead of the bird.
Establish the amount of lead
Not so in shooting maintained lead style, however, and this is where the problems start to creep in. You have to establish in your mind the amount of lead you’re going to give the bird even before you mount the gun. You are relying purely on your experience of reading the clay and being able to judge its speed and trajectory. If you haven’t built up a library of ‘sight pictures’ in your mind you might struggle to master this technique, but the experience will help your overall shooting in the long term.

Be aware of the lead required when using the maintained lead technique
How to master maintained lead
In the first instance, choose a stand where you can shoot the same bird over and over again. A simple crosser is a good way to start.
1. Call for the bird a few times and watch its flight. Tracking the target with your finger can help you remember its flight path and assess its speed. Remember where the visual pick-up point is and think where your kill point should be. Imprint a mental picture of the lead (we’ll call this ‘X’) in your mind as you watch the target in flight. (Read how to improve your visual focus on the clay target.)
Try the next steps a few times with an unloaded gun.
2. Position your feet and body correctly for your expected kill point. With the gun out of your shoulder place the muzzles on the flight line – the same ‘X’ distance ahead of the visual pick-up point. (Read tips on standing correctly for shooting clays.)
3. Call for the bird. As soon as you see the target at the pick-up point, start to swing the muzzles of the gun along the flight line ahead of the clay. The speed of the swing must obviously be commensurate with the speed of the bird, always try to maintain the ‘X’ distance between the muzzles and the clay.
4. Keep the swing going and concentrate on trying to maintain the ‘X’ distance between the muzzles and the clay. Remembering to keep ahead of the target, start to bring the gun up into the shoulder. At this stage it’s important to maintain a smooth swing and achieve a fluid, unhurried gun mount.
5. When the gun is firmly and correctly mounted in the shoulder simply pull the trigger. You know the lead, the ‘X’ factor, should be consistent because you’ve always been ahead of the target from the very moment you first saw the bird. It’s vital, though, to continue the swing after the shot has been fired and you must never stop the gun as you pull the trigger.
6. The next stage is to repeat these steps with live cartridges. It’s important in these early days not to get despondent if you don’t break the clays. If your technique of move, mount, and shoot is perfected, the only variable will be in wrongly assessing the ‘X’ factor. Here it’s wise to have a coach or trusted fellow shooter standing behind you to advise on where you’re missing. If you’re behind the bird simply increase the lead, if you’re missing in front, decrease it.
Remember
The key to shooting maintained lead is being able to assess lead and the only way to improve this is to increase the number of sight pictures in your mental library. As such, you’ve simply got to persevere, work on your technique, and fire more shells. One day everything will just click into place and you’ll be unbeatable.

Swing through
1. The gun is mounted and the swing commences with the muzzles pointing behind the target.
2. The swing continues and the muzzles catch up with the bird.
3. Finally the muzzles of the gun overtake and ‘swing through’ the target. The trigger is pulled and, hopefully, if the correct amount of forward allowance (lead) is given, we smash the clay.
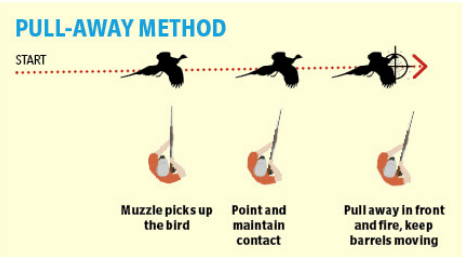
Pull through
1. The muzzles of the gun point at the clay as the swing commences.
2. With the muzzles still pointing at the bird the gun is mounted at the shoulder.
3. Finally, the muzzles are swung away from the target and the trigger is pulled, clobbering the clay.
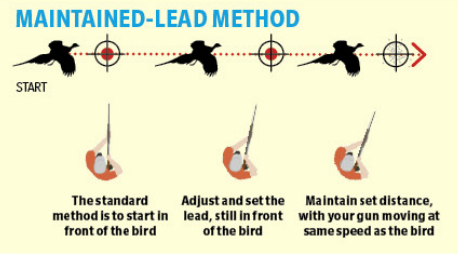
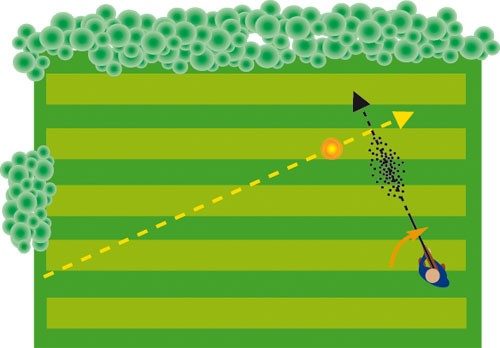
Maintained lead
1. The muzzles of the gun are pointing ahead of the clay as the swing commences.
2. The muzzles stay ahead of the bird as the shooter brings the gun into the shoulder.
3. Finally, when the gun is firmly mounted in the shooter’s shoulder the trigger is pulled and the clay is smashed!
Related Articles
The Gun Shop Directory
A pick of some of the best gun shops for fieldsports enthusiasts
By Shooting Times
Get the latest news delivered direct to your door
Subscribe to Shooting Times & Country
Discover the ultimate companion for fieldsports enthusiasts with Shooting Times & Country Magazine, the UK’s leading weekly publication that has been at the forefront of shooting culture since 1882. Subscribers gain access to expert tips, comprehensive gear reviews, seasonal advice and a vibrant community of like-minded shooters.
Save on shop price when you subscribe with weekly issues featuring in-depth articles on gundog training, exclusive member offers and access to the digital back issue library. A Shooting Times & Country subscription is more than a magazine, don’t just read about the countryside; immerse yourself in its most authoritative and engaging publication.

