★ Beat print – get early access to the news by signing up to the Shooting Times newsletter here ★


Shooting Lesson: The clay from behind
Mark Russell shows how to hit birds coming from behind, and going away.
Now the game season has ended a lot of the lads I shoot with are talking about getting into some serious pigeon shooting for the next month or two.
We all know there’s dozens of ways to carry out this form of pest control – from roost shooting to general walk-about ambushing – but decoying has always been popular.
I’m a great fan of decoying because I think you have a bit more control of the shots you take if the birds drop into your pattern as you want them to.
But what happens if they don’t?
Let’s take a typical example, one that can easily be replicated on the clay ground, and one that I’m sure we’ve all experienced at some time or another!
CASE STUDY
Let’s say we’re decoying pigeons with our back against a hedgerow and every now and again a high bird comes over from behind.
As far as decoying goes, this bird is probably a lost cause.
Nine times out of ten they’ve absolutely no intention whatsoever of dropping into your pattern, in fact, the bird might not even have seen the decoys!

(From experience, there’s a good chance this particular woodie is going straight onto the next field – you know the one, the field on which we’re not allowed to shoot!)
Anyway, that said, it’s a sporting bird, one that we’d be proud to drop – but do we let it fly past without firing a shot?
At a guess I’d reckon it’s at times like this we wished we had practiced a bit harder on the clay ground.
But how to go about it?
What’s the best way of getting a few similar shots under our belt to add this to our library of sight pictures?
AGAINST THE NORM
A lot of shooters struggle to hit a bird presented in this way simply because it forces us to mount and swing the gun in a way that is opposite to our natural instinct.
For most targets the gun is lifted up and into the desired position, the muzzles either on, or behind, or in front of the bird, depending on which style we’re shooting.

In this case though – as the stock is coming up into the shoulder pocket, the muzzles are already moving down to be on the line of the bird.
(This generally flies against the popular theory that a shooter should ‘push and lift using both hands.)
So then, if shooting this type of bird is against the norm, what’s the best way to tackle it?
BEING READY
We’ve already mentioned how practicing on a clay ground will build up our sight pictures, but to do this successfully we’re going to have to hit the targets!
We can gain time by ‘cheating’ a little turning our head and watching the bird as soon as it has left the trap will give an extra three or four yards of visible flightline – and this obviously gives more time to react and shoot the clay.

If you decide to raise and twist your head to look for the bird make sure you’re still comfortable.
If you’re not this will affect your gun mount and you’ll almost certainly be off the line of the bird when it enters the kill zone.
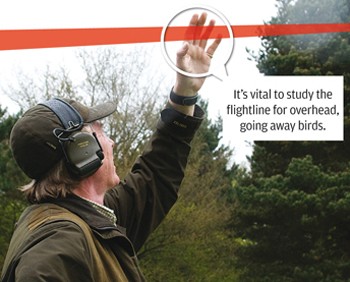
As with any target it always pays to have a look at the bird before it’s your turn to shoot.
But in the case of an overhead going-away bird it’s vital to study the flightline with extra care – we need to know exactly what the target’s doing because it’s our reading of it that will dictate how we stand and address it.
AWAY SHE GOES!
Let’s assume that this bird is going directly away from the stand, and not quartering to one side.
Face the direction of the shot and adopt the usual stance, with feet about a ‘shoulder width’ apart.
Remember: all we’re trying to do is kill the bird, so let’s make things as easy as possible for ourselves.
We need the minimum amount of gun movement so hold the stock just out of the shoulder pocket making sure the muzzles are on the target’s expected line of travel.

Roughly speaking, the muzzles want to be at a point mid-way between where you see the clay overhead, and the place you’re going to break it.
Over the years I’ve found the best approach to tackle this bird is to keep the muzzles in front of the bird at all times – the gap between the end of the barrels and the underside of the clay instinctively tells you the lead’s correct, and that you’re going to dust the clay when you pull the trigger.
That’s not to say the pull away method won’t bring the same degree of success.
Some shooters say the action of swinging away in front of the bird is instrumental in assessing the correct amount of forward allowance needed to break the clay.
I can only say what works for me but I know that both styles dust targets.
Try both for yourself, decide which works best for you and try and shoot as many targets as you can in this way.
The ensuing library of built-in sight pictures will stand you in good stead for the rest of your life and if in doubt keep experimenting with lead until you get it right.
TOP TIP
Bring that hand on the fore-end back a little. If the bird is really high, and virtually above you at your chosen kill point, having your front hand too far forward on the fore end will restrict the swing.
Practice dry mounting and swinging the gun at home and you’ll see what I mean.
Problem with your shooting?
Sporting Gun
PO Box 157
Stamford
Lincs
PE9 9FU
sportinggun@ipcmedia.com
Related Articles
Shooting
Drey poking kit guide: essential equipment for grey squirrel control
Invasive grey squirrels do a great deal of damage to our trees and their numbers need controlling, so you must have the right kit
By Shooting Times
Get the latest news delivered direct to your door
Subscribe to Shooting Times & Country
Discover the ultimate companion for fieldsports enthusiasts with Shooting Times & Country Magazine, the UK’s leading weekly publication that has been at the forefront of shooting culture since 1882. Subscribers gain access to expert tips, comprehensive gear reviews, seasonal advice and a vibrant community of like-minded shooters.
Save on shop price when you subscribe with weekly issues featuring in-depth articles on gundog training, exclusive member offers and access to the digital back issue library. A Shooting Times & Country subscription is more than a magazine, don’t just read about the countryside; immerse yourself in its most authoritative and engaging publication.

