★ Beat print – get early access to the news by signing up to the Shooting Times newsletter here ★

Bargain pigeon decoying
Take a look at ways of saving money on essential decoying equipment
First published March 2010.
As soon as the weather changes, I will be straight down to the rape fields because I’ve got some new decoying gizmos I can’t wait to put to the test.
It’s nice to have them but we really are spoilt for choice these days – especially when some of the best bits and bobs cost next to nothing and can actually be made at home.
In fact I’ve been rediscovering in these cash-strapped days that you don’t have to spend, spend, spend to pull the birds!
Over the years I’ve picked up a few tips and wrinkles from other shooters as well as discovering or designing a few of my own. Not only do they work really well when decoying pigeons and crows, they save lots of money at the same time.
GARDEN STICKS
I’ve lost count of how many times I’ve sat and watched other decoyers wasting a great deal of valuable shooting time as they scour a hedgerow or wood looking for straight or forked hazel sticks on which to prop up freshly shot birds.
In fact this approach is still recommended, would you believe, in some pigeon books and articles I’ve read recently!
During my youth I quickly gave up looking for hazel sticks because they didn’t last long and were easily lost. Then – and now – I use those really useful green plant sticks that you can buy from any garden centre.
There are several plusses to using them: they are inexpensive, strong, don’t bend, last a long time, are very easy to use and store away neatly in the kit bag ready for the next outing. They come in various lengths starting at 12” but this, when broken in two, is a little too short to do the job properly.
Instead, the 18” version is better. I break each in half and sharpen the broken ends, which I slide up through the crop and neck into the skull.
Alternatively, you can simply force the point up under the chin into the scull if you prefer with the blunt end then being pushed into the ground.
However it’s a good idea to sharpen both ends because you will then find they slide into the soil easier in summer when the ground has been baked, and of course frozen ground in winter.
This method of setting up is ideal on drilled or short crops.
GARDEN CANES
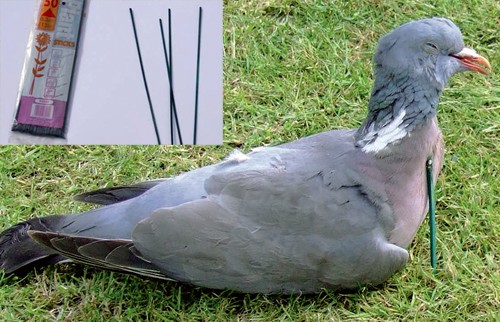
Short garden canes are perfect for showing decoys in taller crops such as oilseed rape, clover and stubbles. The type you need are the short ones used as supports for shrubs such as clematis, honeysuckle etc.
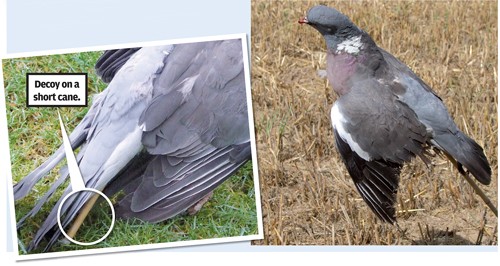
The best size is about 36” – but regardless of length the cane should be sharpened at both ends for the same reasons described earlier.
When using the longer support you should break both wings as close to the body as possible so that they move in the breeze to give that ‘about to land appearance’.
Being well above the crop this decoy will act in the same way as a shortened version of the floater thereby giving increased pulling power inside your static layout.
Shorter 18” canes allow you to set a decoy higher and more prominently than is possible with a garden stick but whatever length of cane you choose the method of presentation is the same: push one end through the bird’s vent, through the body and up the neck into the skull.
Being fixed into the skull prevents the pigeon or crow from sliding down the cane
HOME MADE LANDERS
You can buy all sorts of decoy devices to improve the pulling power of a decoy pattern, but why spend a fortune when you can make your own Landers (angels) at home for just a few pence?
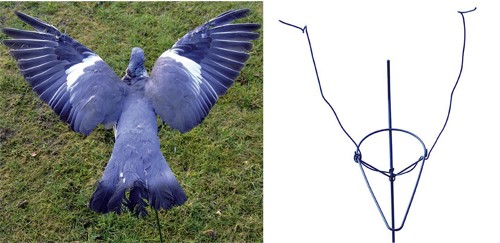
All you need are two or three standard cradles sold by any of the specialist pigeon shooting suppliers that advertise in Sporting Gun.
During your visit to the garden centre, buy a small roll of green plastic coated wire (2mm x 15m) and cut off sufficient to wind round the cradle, with equal lengths on each side as shown in the photograph here.
In the field, break both wings on a freshly shot bird then set it up as you normally would when using the cradle in the normal way. Now stretch the wings well above the head, and twist the wire around two or three primary wing feathers.
I usually position mine at the front end of the pattern nearest the hide, a couple of feet inside the killing area and close to the flappers. Even without flappers it’s amazing to watch high incoming pigeons close their wings and drop like a stone straight into the front of your killing area.
If you want challenging shots, try hitting them as they dive.
PAINT YOUR OLD DECOYS
Over the past few years I’ve used and field tested flocked pigeon decoys and don’t rate them too highly. In my opinion a standard half shell decoy is just as good at pulling in the pigeons.
However, crow decoys are a totally different kettle of fish and they definitely do work much better when flocked.
Regardless of whether you use shells or full-bodied pigeon decoys there eventually comes a time when you will start thinking about buying a new set to replace those that have become tatty through use or shine in bright sunlight.
But instead of binning the old ones why not save even more hard cash by giving them a quick lick of paint? I get mine from a local merchant who mixes me a medium can of matt grey to match the ‘pigeon grey’ shown on his chart.
I then select smaller pots of both matt black and white, and finally, a medium packet of Polyfilla in powder form. Back at home I give all the deeks a good wash and scrub and once they’ve dried off I’m ready to slap on the paint.
The first – and most important job – is to make sure that the grey you are going to apply is exactly the same as the grey of a real pigeon. To do this paint a small area of the decoy and then, when dry, compare the colour to that of a dead bird taken from the freezer.
Usually, you will need to add some white if it’s too dark; rarely is it too light requiring black. Keep repeating this until you get it right.
Once done, mix in a reasonable amount of the powder to bulk up the paint and also improve its matt finish. You now have a complete pot ready for the remaining decoys so paint the lot, and don’t worry about covering some of the white or black neck and body markings.
Once dry and you are happy with the result, crack on with the black by mixing in the powder and paint on as it appears on that dead bird.
Leave to dry.
Now for the white, but be careful, use more powder and only apply a little paint at a time otherwise you will find that it runs.
The patches on each side of the neck should be fairly large, about 30-40% larger than real life because incoming birds use this as a recognition signal.
I don’t bother painting white bars on the wings, as this, I don’t think, is seen or looked for by incoming birds.
CROCODILE CLIPS
Clips are a necessity for the pigeon decoyer because they save so much time when it comes to hide building.
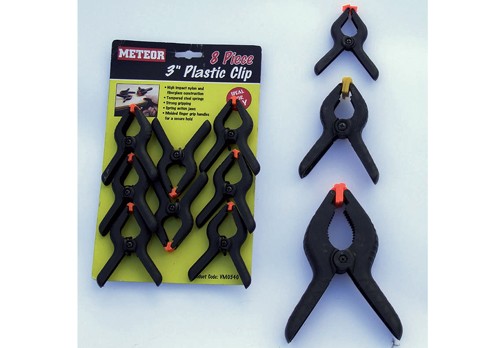
The medium sizes are ideal for fixing netting to the poles making erection and take down so much faster, and height adjustment is also much easier and quicker.
The larger clips are used to secure the net to high branches on each side thereby saving the use of the two back poles.
You will find it much easier to enter and exit without a hide pole getting in the way, and less chance of your dog knocking the whole lot down on top of you as well!
The best place to find clips is at a game or country fair but you can also order them from an ironmonger – just make sure that they are plastic and not metal which often shine in the sun.
Related Articles
Shooting
Drey poking kit guide: essential equipment for grey squirrel control
Invasive grey squirrels do a great deal of damage to our trees and their numbers need controlling, so you must have the right kit
By Shooting Times
Get the latest news delivered direct to your door
Subscribe to Shooting Times & Country
Discover the ultimate companion for fieldsports enthusiasts with Shooting Times & Country Magazine, the UK’s leading weekly publication that has been at the forefront of shooting culture since 1882. Subscribers gain access to expert tips, comprehensive gear reviews, seasonal advice and a vibrant community of like-minded shooters.
Save on shop price when you subscribe with weekly issues featuring in-depth articles on gundog training, exclusive member offers and access to the digital back issue library. A Shooting Times & Country subscription is more than a magazine, don’t just read about the countryside; immerse yourself in its most authoritative and engaging publication.

