★ Win a pair of Brandecosse Capriolo boots worth £219! Click here to enter ★

How to shoot well (Part One)
Shoot well: To shoot well you have to get the basics right.
The first thing one needs to shoot well (assuming you have a gun that is not totally unsuitable) is a basic understanding of what to do in a physical sense. It does not have to be complicated. Shooting is not atomic physics, but nor is it something you can necessarily teach yourself. Some people get lucky with self-tuition, but for every one that does there are three or more who don’t. In this, the first of two articles, I set out some fundamental principles.
If you continue to have difficulties, you need to seek out a shooting instructor. But here I start with the basics – how to stand, how to hold the gun, how to address the bird, etc.
Safety first
I want to begin with safety, because I want to encourage you to pick up an empty gun and actually try out some of what is suggested on the page here in a suitably safe place.
The golden rules are:
1. Treat all guns as loaded.
2. Never point a gun at something you do not wish to shoot.
3. Always check a gun is unloaded and unobstructed when you pick it up, put it down or pass it on.
I might add that if you are practising dry, do it in a sensible, secluded place. It can be unnerving for the neighbours if they see you waving your shotgun around in the evening!

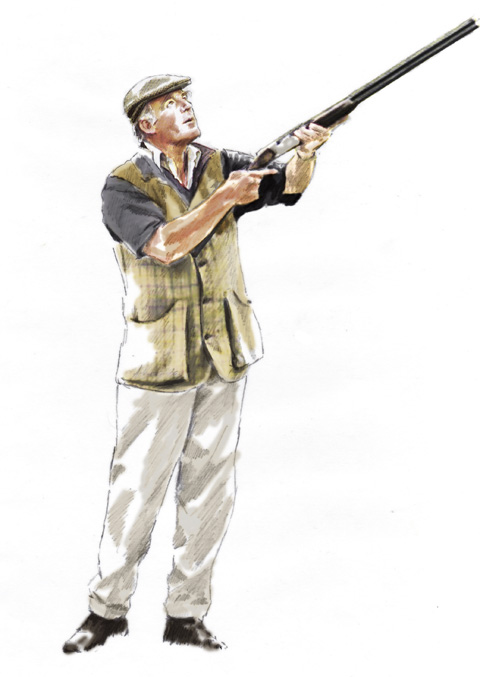
To shoot well consistently you must adopt a comfortable stance. And if this method suits you then the front shoulder, the front of your leading hip and the ball of your front foot should all be in a straight line.
How to stand
Foot position and stance are the first on the list, working from the ground upwards. If you are intending to shoot towards 12 o’clock on a clock face, simply stand square, feet about six to nine inches apart. Now, take a half pace forward onto your left foot if you shoot off the right shoulder (and vice versa if you are left-handed). Don’t step too far forward. Bring your weight on to the front foot and let the rear foot rotate naturally about its ball. You should end up with your feet at about one o’clock and three o’clock, though there is room for a bit of individual variation.
Ultimately, you must judge what is comfortable
The front shoulder, the front of your leading hip and the ball of your front foot should all be in a straight line. You should not be arching your back or leaning excessively forward. You should be able to pivot on the front foot and your nose should be over your toes when you actually shoot. Your stance must be comfortable and unstrained. Initially, if you are not used to this classic position, it may seem if your weight is a little further forward than seems natural. When I teach beginners, I often find myself encouraging them just a little further forward with gentle pressure on the back of their shooting shoulder with the flat of my hand.
This method of shooting, as most famously advocated by Percy Stanbury, has the rear heel slightly raised and the front leg straight. Some prefer to stand with a more central centre of gravity, without the raised heel. Others relax the front knee a little – bending it slightly. I do this when I want maximum stability in windy positions on grouse or partridge. I change the orientation of the feet slightly on the clock face when I do it, though. The front foot points at 12 o’clock and the rear foot is at two o’clock. But, for most normal driven work, I prefer the classic style. I suggest that you master it first.
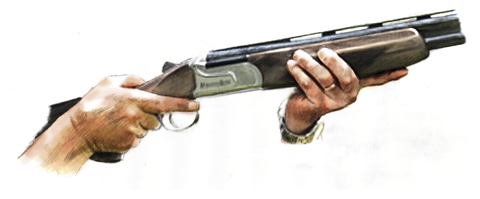 To shoot well it is vital the front hand does not obscure the view of the rib and the trigger hand is not too close to the action.
How to hold the gun
Having considered the basics of how to stand and noted there is room for individual variation, let us consider how to hold the gun. Here’s a very simple system. Take the empty gun and close it under control in a safe direction, usually down towards the ground at about 45 degrees. Now gently pat the side of the butt with the hand that will hold the grip, holding the gun on or near the action with the other hand. Slide the rear hand forward along the stock onto the grip and wrap the fingers around it. You will take up a perfectly natural position without tension. The trigger finger should be extended on the trigger guard. The thumb should not be ‘riding’ the safety catch, which can cause a painful injury from the top lever in recoil, but should be wrapped around the grip comfortably.
Minimise tensions in the wrist and maximise control
Don’t bring the web of the hand too high on the grip – if you use the pat-the-butt-and-push-straight-forward method, this will not happen. You want to minimise tensions in the wrist and maximise control. The wrist should not be excessively cocked. The base of the thumb should usually be in gentle contact with the nose of the stock comb. The middle finger should be well behind the trigger guard and not touching it. The trigger finger should be able to reach the trigger or triggers comfortably, though.
Although the resting position of the trigger finger should be extended on the trigger guard, you should also consider where the trigger finger should be positioned when it is on the trigger. Some favour the first joint of the trigger finger, some the pad, some the finger tip. My choice is to use the middle of the pad as it allows for more control and is more sensitive.
The difference when using a side-by-side and an over-under
Time to consider the front hand – extend the front arm with the hand, relaxed and palm down, (this will be the left hand/arm for a right hander firing off the right shoulder). Now rotate the hand palm up and just let the fore-end drop naturally into it. If you are using an over-under you should hold the fore-end midway, as indicated by the chequering. If you are using a side-by-side, however, you should hold towards the front of its fore-end. In either case, if you want to extend the index finger as an aid to pointing feel free to do so.
Do not to let fingers obscure your view down the rib. It is also a mistake to bring the front hand too close to the action because this will diminish control. Just as it is an error to extend it too far forward, which will restrict the swing and impede your ability to lift the gun well. Holding too far forward will cause you to come off line in some situations. Some very good shots do it, but they succeed in spite of it in my opinion. It creates unnecessary tension.
The ready position
Now let’s look at the basic ready position. When game shooting one must remain aware of safety at all times. The muzzles must, therefore, be held well up – whether one is standing on a peg, or, walking-up, ready for action. My preferred address position has the bead just below the line of sight with the eyes scanning for birds above the muzzles, safety catch applied, of course.
Sometimes, though, you will have to bring the muzzles higher than this for safety and look ‘through’ them. You should never shoot a driven bird unless you have identified it as a safe and legitimate shot. Apart from when grouse shooting you must always see sky all the way around the bird.
Want to shoot well? The key to success is to achieve focus
As I stand and wait I usually like to keep the butt of the stock gently indexed against my rib cage. Sometimes, I come out a little so that I am holding the gun more forward, the butt and muzzles a little higher with the comb roughly parallel with my forearm. If there is no imminent prospect of action I will wait with the butt sole on my hip, muzzles near vertical.
The last thing I will mention is vision. It is so critical that it can never be over-emphasised. The key to success is to achieve focus on the bird and keep it there – this is a skill requiring effort. You need to determine whether or not you will shoot with one eye or two (two is better if your eye dominance allows it). But, either way, you need to keep focus locked on the bird, or, better yet, the head or beak of the bird all the way through the shot.
Test your eye dominance
You will need a friend. Stand square to him (or her) at a distance of about 10 feet. Keeping both eyes open, point your index finger at one of their eyes, as they should indicate. They may be able to note immediately whether your right or left eye controls your pointing process because your finger will appear exactly in line with that eye (in which case it is probably your master). They may, however, note something else happening – for example, you moving the finger around as you point using one eye to ‘aim’ then the other. There may be other evidence of visual confusion with both eyes open. Another possibility, and one that may be harder to spot, is that you are predominantly dominant in one eye, but that the other seems to pull you across and out of line a bit. Some people have neither eye dominant (central vision), some, especially the young and women, eyes which fight for control (indeterminate eye dominance).
Bottom line? If one eye is clearly dominant, keep both eyes open and shoot off that shoulder if you can. If not, you may need to squint the weaker eye, block the vision to it, or, have your gun stock adjusted in compensation. Definitive answers will require a professional gun fitter.
A quick guide to gun fit
With the gun in the shoulder the top of the stock should be in line with or just below your shoulder and the butt sole should be positioned between collar bone and shoulder joint, or resting on the shoulder joint but not on the arm. With your head down comfortably and the stock in your cheek there should be a gap of about one to two fingers widths between the base of the rear thumb and the tip of your nose. And your rear arm elbow angle should be about 90 degrees.
When you look along the rib, it should not appear that you are looking down one side significantly. And you should be able to see the bead and a little rib with normal cheek pressure. The rib should not appear to be climbing excessively either. With increased cheek pressure you should not be able to lose the bead completely, nor should you be able to lose it when the gun is pointed up.
Related Articles

Stalking diary: the boundary-crossing buck that made the morning hard work
Waking at 3am is only half the battle when a boundary-crossing young buck decides to make Charlie Blance's morning roe stalk as difficult as possible
By Charlie Blance
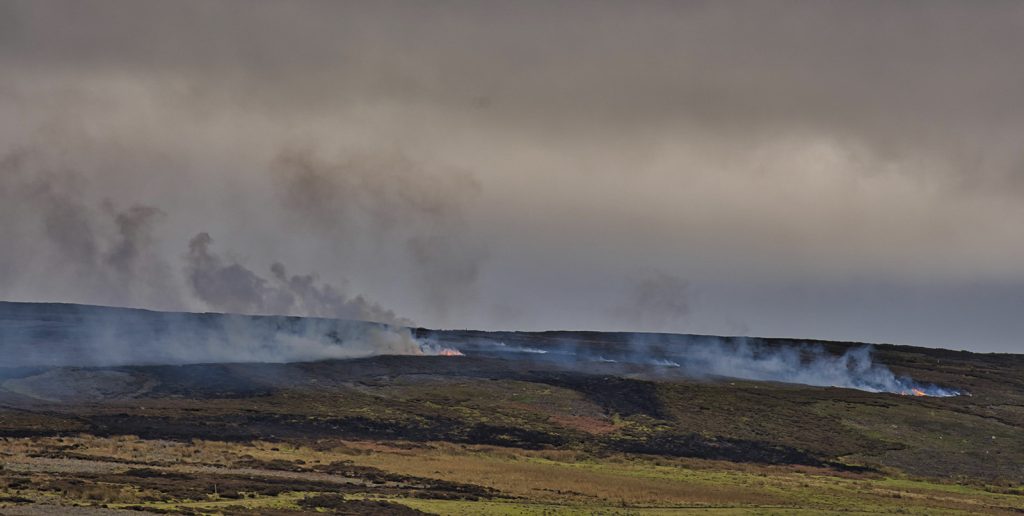
Gamekeepers refuse to endorse Scotland's new muirburn code
Scotland's gamekeepers say they will not endorse the revised Muirburn Code when NatureScot publishes it on 1 July, warning that it strips out the tools they rely on to fight wildfire and puts public s...
By News Desk
Get the latest news delivered direct to your door
Subscribe to Shooting Times & Country
Discover the ultimate companion for fieldsports enthusiasts with Shooting Times & Country Magazine, the UK’s leading weekly publication that has been at the forefront of shooting culture since 1882. Subscribers gain access to expert tips, comprehensive gear reviews, seasonal advice and a vibrant community of like-minded shooters.
Save on shop price when you subscribe with weekly issues featuring in-depth articles on gundog training, exclusive member offers and access to the digital back issue library. A Shooting Times & Country subscription is more than a magazine, don’t just read about the countryside; immerse yourself in its most authoritative and engaging publication.

